

Part I: Depth of field
Correct focusing, as trivial as it may seem to users of small cameras like an SLR or even an autofocus camera, can become – and more often than not actually does become – a challenge when working with a large-format camera, in particular when the term “focusing” is meant to encompass all the correct camera adjustments needed to obtain a flawless, throughout sharp image with sufficient depth of field (DOF). Given that the superior technical quality of the final print is one of the major reasons for using a large format camera, it is clear that the LF photographer needs to understand and master proper focusing.
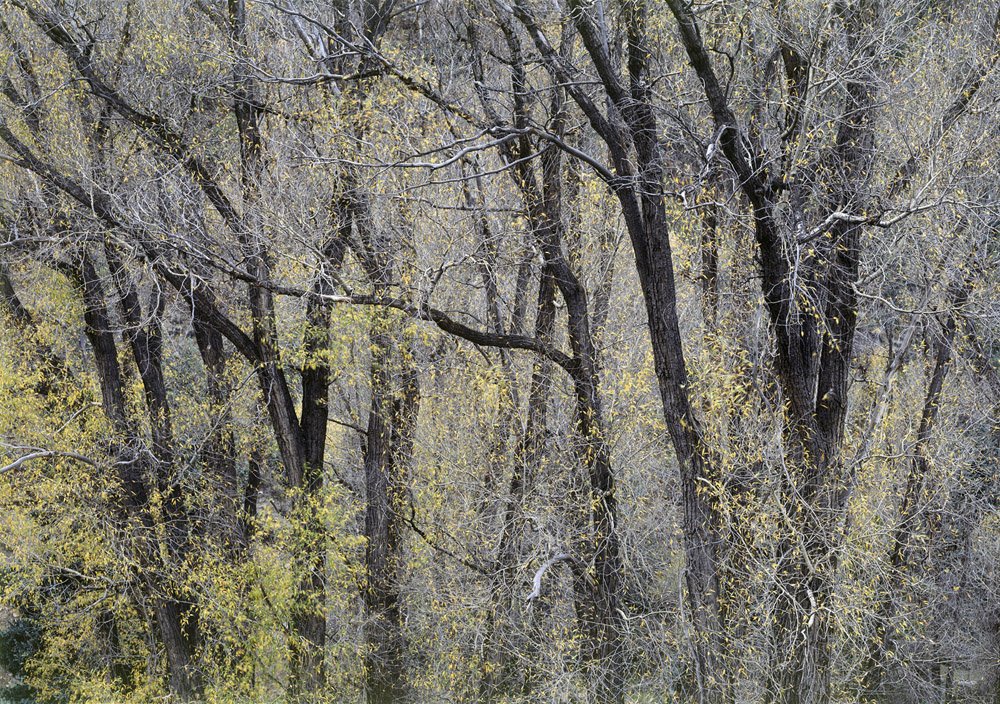
Figure 1: Silver and Gold. Stand of old Cottonwood trees in Colorado; Sinar 5×7´´, Apo-Ronar 9/300, RVP 100, 1 sec @ f/22 +2/3. This is an example of a shot which would seriously suffer from an insufficient depth of field – had both the branches close to the camera and those in the background not appeared tack sharp, this shot wouldn´t have made it into my portfolio. The moderately long lens required stopping down to a bit less than f/32 – needless to say that this was determined using the technique described in this blog post.
The reason for the difficulty to perfectly focus a LF camera simply is the fact that in large format everything is – well: larger. Among others this means that the focal lengths in the LF world are much longer than for small cameras – for example, the normal lens for a 4×5″ camera has a focal length of 150 mm, and the normal lens for an 8×10″ camera is 300 mm. Unfortunately, the depth of field of a lens decreases with increasing focal length, and it is exactly this theme of limited DoF which is a large format photographer´s steady companion. While in smaller format photography long lenses are often used to isolate an in-focus main subject from an out-of-focus blurry foreground and/or background, this is not often done in large format photography. Rather, here one normally tries to bring all elements of a composition into focus (or, more precisely, into the DoF zone within which everything appears if not perfectly, then at least sufficiently sharp). But how can this be accomplished with an average three-dimensional scenery when even a super wide-angle lens for an 8×10″ camera, equivalent to a 20 mm lens for 35 mm cameras, still has a focal length of 120 mm?
Stopping down is the first thing which comes to mind, and in LF photography this is absolutely essential: in practice you will never shoot wide open, both because of the minute DoF at open aperture and because traditional LF lenses, other than some modern digital lenses, are designed to be really sharp only when stopped down. Typically an LF lens´ “sweet spot” (the aperture where sharpness is at its maximum) lies somewhere between f/16 and f/22, regardless of its speed. Having a close look at how LF lenses perform, it often can be observed that a lens shows its highest performance in the center around f/16, with the corners being noticeably less (but still acceptably) sharp. Stopping down to f/22 then allows the corners to catch up, while sharpness in the center already begins to slightly degrade due to diffraction. So as a rule of thumb one may say that for many if not most LF lenses f/22 provides the best overall sharpness, with resolution in the corners being not much behind the performance in the center – of course always provided everything is in focus. While theoretically DoF can be increased by stopping down further – some LF lenses allow to stop down to f/90 or even f/128 – for formats of 8×10 and smaller stopping down a large format lens to beyond about f/32 is no good practice, because then diffraction kicks in and will start to visibly degrade image quality. It is often overlooked how dramatic this effect is: while diffraction limits the theoretical maximum resolution of a lens at f/22 to 68 lpm (= line pairs per millimeter), stopping down to f/45 cuts the achievable resolution down to only half of this value, 34 lpm. At f/64, only 24 lpm is left, and now even two thirds or more of the lenses resolving power are being wasted – that´s not why you decided to go for an LF setup.
On the other hand it needs to be seen that picture elements which are clearly out of focus are even worse than an overall somewhat “soft” image suffering from diffraction. Accordingly the goal will be to make sure that all parts of a subject will be within DoF, and at the same time to achieve this without stopping down too much. Camera movements (which are not part of this blog post) are often absolutely indispensable for obtaining sufficient overall sharpness of an image, but even with perfect adjustments of the camera it often remains a challenge to find the best possible compromise between sufficient DoF and limited diffraction.
I believe it´s fair to say that in the practice of LF landscape photography you´ll almost never be in the situation where you have any DoF to waste. Rather, DoF has to be seen as an invaluable and limited resource you have to be very considerate about, and more often than not to fight for – every carelessness will almost inevitably result in a loss of sharpness somewhere (or everywhere) in your image. If you locate your focus point at the wrong distance, too close or too distant parts of your subject will appear out of focus. If you don´t close the aperture far enough, DoF won´t suffice, and both too close and too distant picture elements will look blurry. If you close the aperture too far, diffraction will degrade resolution across the entire image. This situation might remind some people of thermodynamics, where the first law says that you can´t win, while the second law then informs you that you can´t even break even, and in any case means that proper focusing requires all your attention and skill.
From this it becomes clear that for a rational approach to focussing it will be indispensable to know exactly, once the camera has been set up and all movements made, from where to where DoF needs to extend, and which focus setting and which aperture will be needed to provide exactly this DoF, not more and not less.
What comes in extremely handy here is a DoF calculator like the one Rodenstock used to make (Fig. 2). The concept behind this calculator is strikingly simple so that it´s very easy to use: you just have to determine the extension difference between the near and the far focus points on your camera, which directly translates to the aperture needed for your shot. This sets the Rodenstock calculator apart from the numerous electronic DoF calculators available today, some of which are web-based (which doesn´t help much anyway when you´re out in the middle of nowhere) while others come in the form of smartphone apps. Unfortunately most if not all of these electronic calculators, and in any case all which I have seen so far, require you to enter the near point and the far point as measured as the distance between your camera and selected elements of your subject, not as extensions of your camera. This renders them virtually useless for outdoor use unless you find a way to reliably determine these distances in the field.
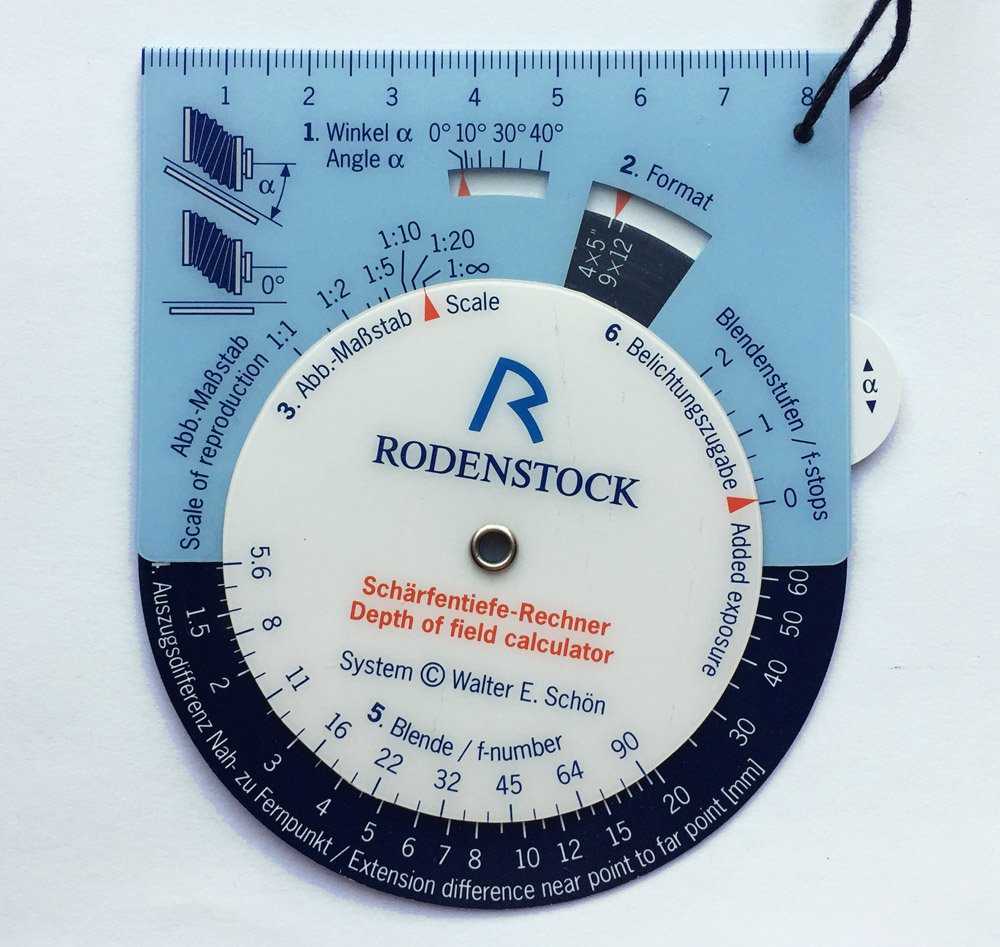
Figure 2: Rodenstock´s depth of field calculator
For determination of the extension difference it´s ideal if your camera has a scale like many monorail cameras have (Fig. 3). If your camera is not equipped with a scale, you can use a millimeter scale ruler which for this purpose could be removably attached to your focussing standard, e.g. using velcro. Once the two focus points have been determined, you´re almost done: just position the focusing standard at the exact middle between the near and the far focus point and close the aperture to the value required by
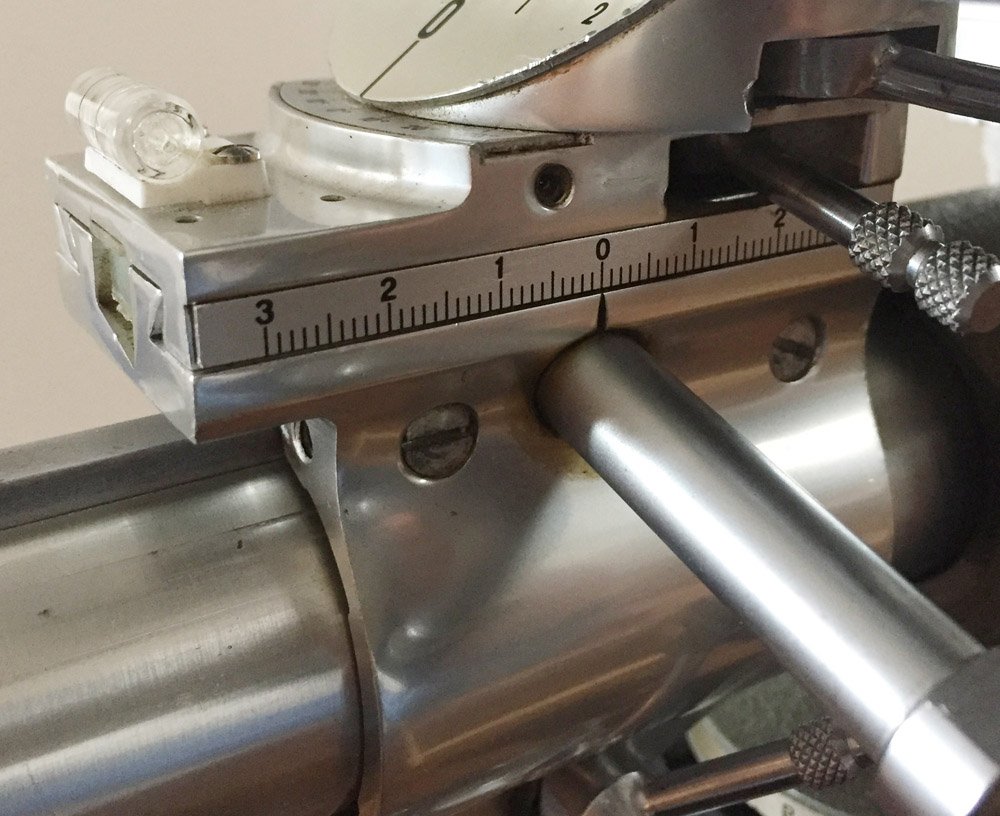
Figure 3: The millimeter scale on a focussing standard. The example shown here is the front standard of a Sinar Norma camera. Sinar´s monorail cameras allow choosing from either the front or the back standard to be used for focusing, depending on the situation.
the distance between the two extreme focus points. This value can either be read from your calculator (Fig. 4; read: with an extension difference of 4.0 mm, the calculator suggests f/16) or be taken from one of the tables below. The beauty of this approach is that the effect of the focal length on DoF is already factored into the extension difference itself and does not need to be further considered or corrected for. For example, an extension difference of 4.0 mm will always require stopping down to the same aperture, regardless of whether obtained with a 47 mm superwide lens or a 300 mm long lens. Also, forget about the “one third / two thirds rule” – using the focusing method presented here, the correct focus point is at the middle between the near and the far focusing point, nowhere else.
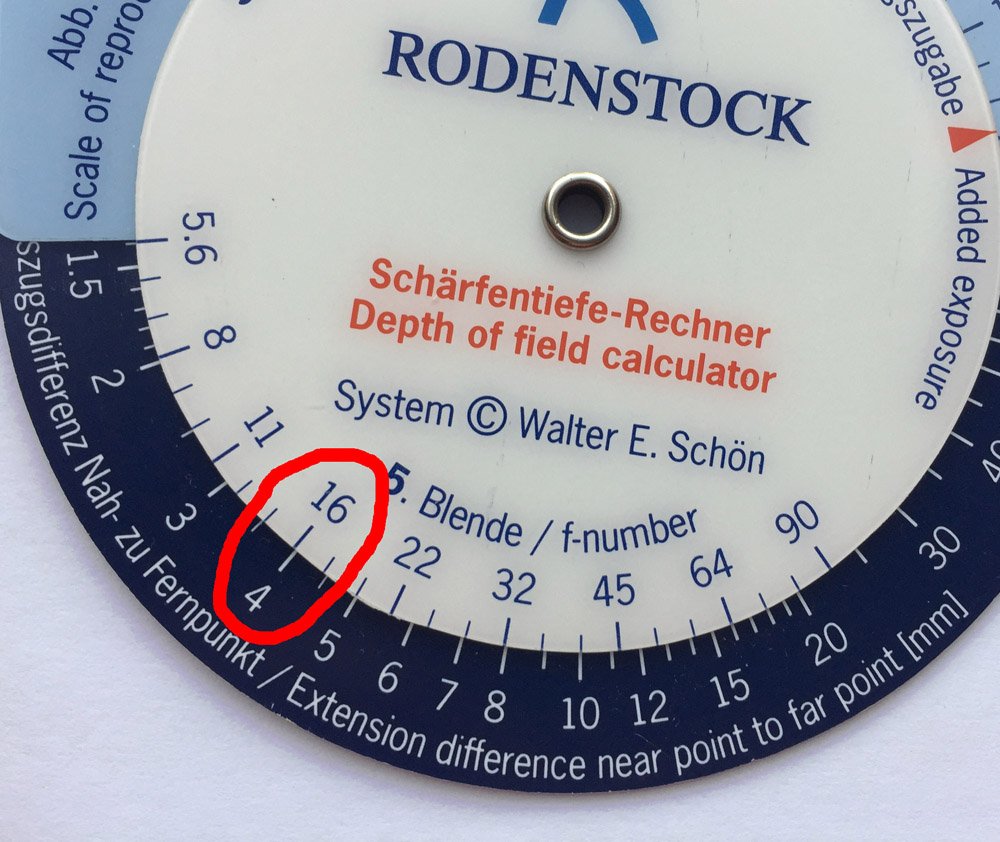
Figure 4: Reading the Rodenstock calculator
While the Rodenstock calculator works for essentially every LF camera, its use is particularly straightforward with cameras which allow both the front and the rear standard to be used for focusing, and which have fine drives with an engraved millimeter scale. These features in this combination won´t be available for most flatbed cameras (in which case you´ll have to improvise a bit), but they are pretty common in case of monorail cameras (e.g., Sinar). For these the workflow is as follows:
- Coarse focusing by adjusting the distance of the standards on the rail. While doing so, make sure that the fine drives of both standards stay in the “0” position.
- Fine focusing using the drive of one of the standards to the far point – the drive of the other standard remains in the “0” position.
- Fine focusing using the drive of the other standard to the near point – don´t touch the first standard in this step anymore.
- Reading the additional extension (in millimeters) needed to shift the focus from the far point to the near point.
- Determining the appropriate aperture corresponding to the additional extension using the calculator; stop down accordingly. Don´t forget the correction for an appropriate circle of confusion, as described below.
- Moving the second standard back to the exact middle between the near and the far focusing adjustments (i.e., to 50% of the additional extension) – and you´re ready to shoot.
While this description may sound a bit lengthy and complicated, in practice it´s absolutely easy to follow, and in the time needed for reading this paragraph you could have focussed your camera according to this technique two or three times.
Unfortunately Rodenstock has not only discontinued their line of outstanding LF lenses, but they also don´t make this fantastic tool anymore, so you´ll have to look for one of the places where they still have a couple of these calculators remaining on their shelves, to spot some forgotten stock which may show up from time to time, or get a used one. As of July 2019, you can still buy the calculator from the following sources: US – B&H (USD 79.95), Badgergraphic (USD 44.99); UK – Linhofstudio (GBP 34.00); Germany – Foto Mueller (EUR 37.20), W. E. Schoen (who actually designed the Rodenstock calculator; EUR 42.00). Alternatively you can laminate either a photocopy of the calculator (or a small number of photocopies with the calculator being adjusted to different scales of reproduction and to different front tilt angles, if that is relevant for your photographic style) or simply a printout of a table with the most important numbers (see tables 1-3). For those who are frequently working at reproduction ratios in the 1:1 to 1:20 range, Linhof has published a depth-of-field chart which also works on the basis of extension differences.
Finally, there is still one more interesting variation of the theme: DoF scales on the focussing knobs of some monorails which you can find, e.g., on Sinar´s f2 and P2 cameras. For those with the necessary patience and skills, instructions of how to make such a scale for other cameras (e.g., an Arca Swiss F-line) have been published on QT Luong´s Large Format Photography page.
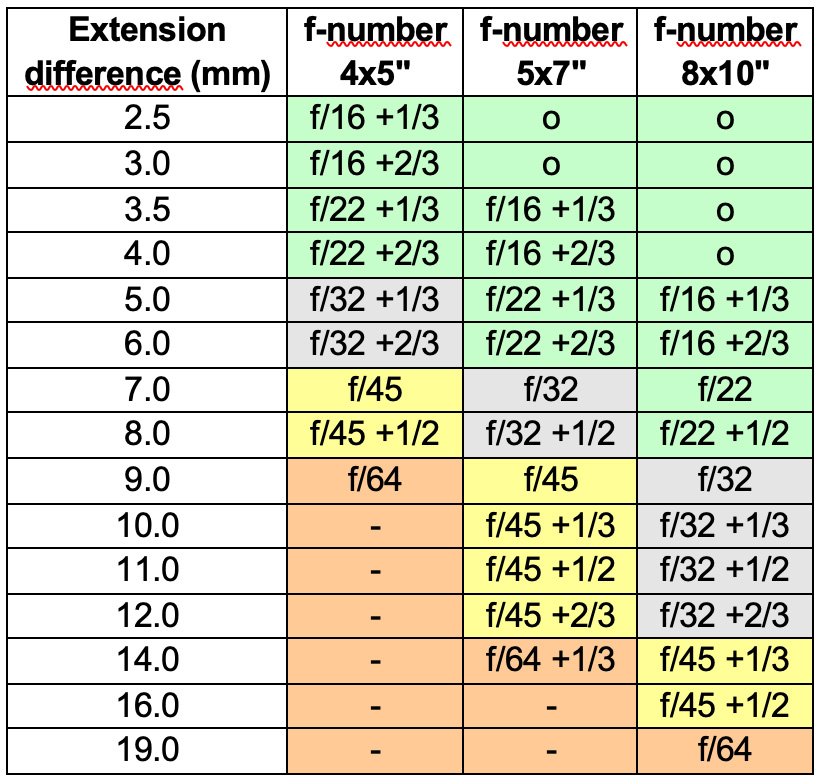
Table 1: f-numbers for 1:∞ scale and zero front tilt. In deviation from the Rodenstock calculator, f-numbers already have been corrected for a smaller circle of confusion (see main text) and can be directly used without further correction. The (corrected) numbers in the table are based on those indicated by the calculator and thus depend on the shooting format. As explained in more detail in the main text, I nevertheless recommend using the values determined for 4×5 also for 5×7 and 8×10. Depending on the lens you are using, working at f/32 (fields shaded in grey) typically does not provide optimal resolution due to diffraction and tends to soften what actually should be tack sharp. Yellow fields indicate the onset of clearly visible image degradation due to diffraction. I cannot recommend stopping down to f/45 or beyond regardless of the format you´re using; this is nothing but an emergency solution if nothing else helps. Orange fields mean that you should seriously consider further refining your camera movements or even to change your composition since diffraction will seriously limit image quality. An alternative, although very time-consuming at the post-processing stage, would be focus stacking of images shot at a bigger aperture (of course only feasible if you use a hybrid workflow via scanning your film). A dash indicates situations in which stopping down beyond f/64 inevitably would cause such a loss of image quality due to diffraction that using a large format camera probably is not a good choice here. Finally, those rare situations in which a very small extension difference would allow to work with an aperture larger than f/16 (which would be out of most LF lenses´ “sweet spot” of sharpness) are indicated by an “o”. Here, in practice an aperture in the classic f/16…f/22 range is recommended.
However you implement this all in practice: working with precise focus adjustments and carefully determining the optimal aperture for each of your subjects will eliminate a lot of guesswork from your LF photography, and can lead immediately and effortless to technically significantly improved images.
In practice, a number of points need to be kept in mind though.
First, a correction factor has to be considered if you either use front tilt and/or are shooting a close-up subject, with a scale of reproduction of more than 1:20 or so. A nice thing about the Rodenstock calculator is that such parameters can be factored in very easily by making appropriate adjustments to the calculator; when working with a table, a little bit of guesswork may come in again. Table 2 provides the f-numbers for a reproduction scale of 1:10, table 3 the f-numbers for a tilt angle of 30°.
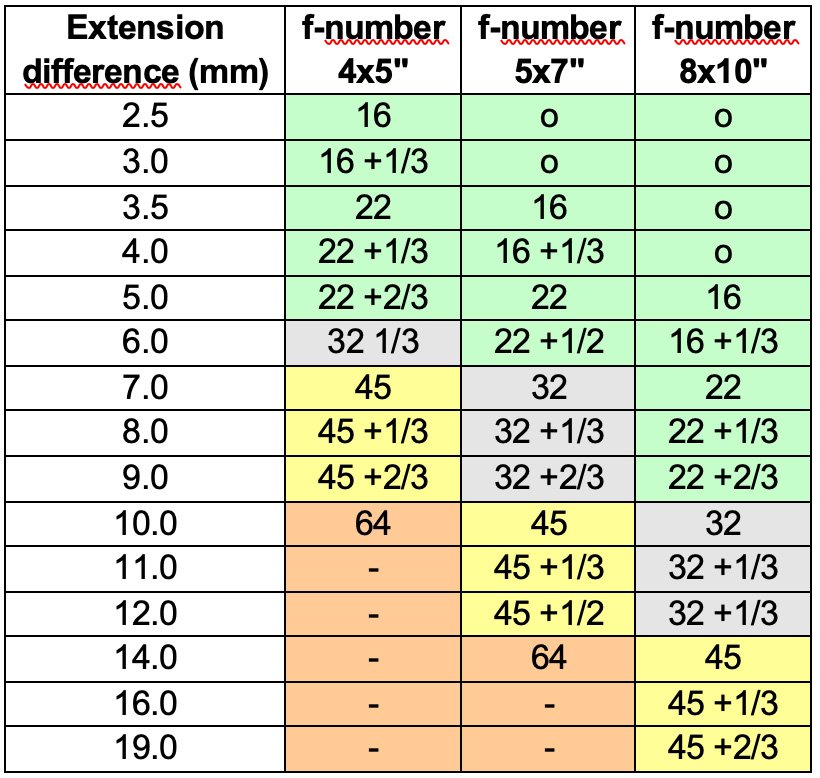
Table 2: f-numbers for 1:10 scale and zero front tilt. Like in table 1, f-numbers are corrected for a smaller circle of confusion.
Second, to my experience the circle of confusion used for these DoF calculations (which corresponds to the international standard circle of confusion of 0.03 mm for the 35 mm format) is too optimistic and does not fit today´s expectations regarding the sharpness of a somewhat larger print. I experienced this already many years ago on when using the DoF scales of my manual 35 mm Nikon lenses and bumped into the very same problem again after moving to Large Format. In order to overcome this, I recommend closing the aperture by one more stop than the calculator (or the DoF scale on a 35 mm lens) suggests. In the example of Fig. 4 above, I´d use f/22 instead of f/16 as the working aperture. In my hands this correction by one-stop provides highly satisfactory results, but the necessary correction will depend on your particular requirements, first of all the size at which you intend to print and the viewing distance from which your prints are expected to look flawless.
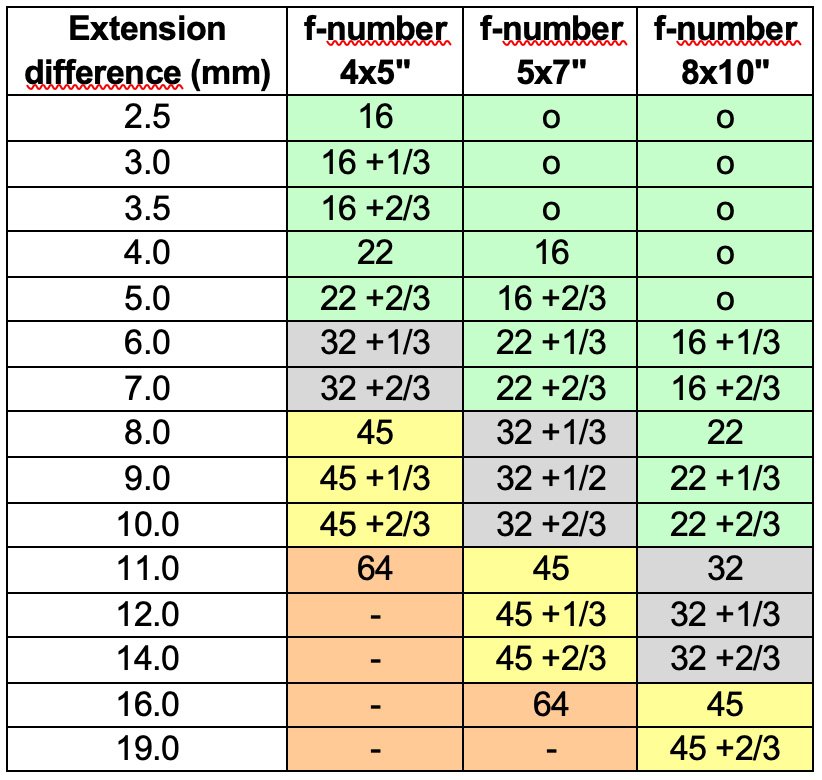
Table 3: f-numbers for 1:∞ scale and 30° front tilt. Correction like in tables 1 and 2.
Third, the logic behind these calculators assumes different scales of reproduction for different film formats. For example, it is assumed that because an 8×10″ negative needs to be enlarged only half as much as a 4×5″ negative for obtaining a print of the same final size, the allowable circle of confusion is twice as big for an 8×10″ camera. With this concept I do not agree, because I don´t want to pay four times as much for an 8×10″ sheet of film and its development and carry three times the weight in the field, only for obtaining essentially the same image quality which I can easily get out of a 4×5″ negative. While theoretically these numbers of course are correct, they suggest using the larger formats (5×7″ and 8×10″) in a way which I deem pointless. Instead I personally think that whenever possible the values determined for 4×5″ should be used regardless of whether shooting 4×5″ or larger, even if that means that in practice an 8×10″ camera will only provide superior results in comparison to smaller cameras with subjects which have not much depth and thus allow to work at f/22…f/32. Due to the deleterious and inescapable effect of diffraction, an 8×10″ negative shot at f/45 won´t contain more detail than a 4×5″ negative of exactly the same subject shot at f/22 from the same distance with a lens having half the focal length. It thus is just more expensive, without providing any advantage in image quality (except maybe looking more impressive on the lightbox).
One last thing: I absolutely don´t advocate focus stacking in large format photography, since it can be extremely tedious and cumbersome to perfectly combine the scans of two or even more differently focussed images to one flawless image file. One reason for my reluctance to do focus stacking is that in my experience for unclear reasons the scans to be combined tend to show distortions which prevent them from fitting perfectly. This effect renders their combination an editing nightmare which can cost you many hours if not days of work until everything is perfect. And don´t even think of letting the software do this for you – dismay would be guaranteed. That being said, unfortunately there are occasions where there simply is no real alternative to focus stacking, namely when in order to obtain the required DoF for an image you´d need to stop down so seriously that diffraction would essentially eat up all the advance large format has over smaller formats. In such cases, and they come up from time to time, I definitely prefer to combine two images shot at f/32 over one single image shot at f/64 which would be guaranteed to lack overall sharpness. In such instances you need a tool to set your two (or more) focus points as precisely as you can, and for this again a DoF calculator is simply indispensable. Fig. 5 is an example of a successful focus stacking project, but this took me more than two days of not very pleasant computer work until the two 400 MB scans had been seamlessly merged into one file.
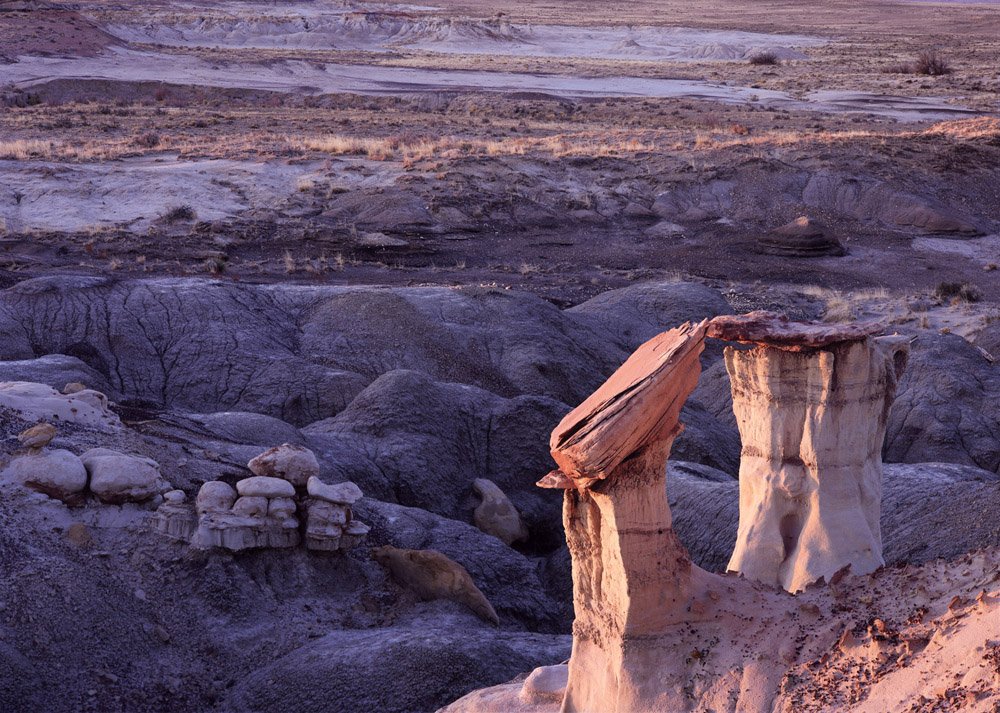
Figure 5: Carboniferous. Hoodoos and coal bed in New Mexico; Sinar 5×7´´, Nikkor T-ED 9/360 mm, RVP 100, focus stacking of two exposures taken at 1/4 sec and f/32. Due to the difficult topology of the location there was no way to switch to a different composition which could have alleviated my focussing problems. I thus decided to apply focus stacking and to “split” the shot (which otherwise would have required stopping down to f/64) into two separate exposures at f/32.
Taking all these aspects into account, DoF calculators are a reliable, inexpensive and easy-to-use means to replace all the guesswork otherwise needed by a rational approach to focussing and stopping down. In order to get the highest technical quality out of large format photography you need to work as precisely as possible, and these calculators provide you with exactly the information you need to reach that goal. I´m using mine for practically every single shot, and I know that I´d be way less satisfied with the sharpness of my images if I didn´t.
Part II – Using calculators in large format photography

Name: Frank Sirona
Location: Germany
Description: I´ve been interested in landscape photography since I saw for the first time a number of dye transfer prints made by the pioneer of color landscape photography, Eliot Porter. After my Nikon years I had a brief affair with a Mamiya 7, until in 2004 I finally upgraded to large format. Since then I´m shooting film using my swiss made 4×5, 5×7 and 8×10 Sinar cameras. Of these, the 5×7 has by far become my favorite, since weight and bulk of a 5×7 are still somehow manageable when air traveling (flying with a 8×10 monorail is a pain, believe me!), while the big groundglass is just a joy and makes composing easier than with a 4×5 camera. Also I personally do like the 5:7 side ratio much more than the 4:5 ratio of the other two standard large formats. The majority of my work has been done in the Desert Southwest, and I continue returning there whenever I can.
Website: www.franksirona.com
Instagram: @franksirona

0 Comments